Shared Borders in FrontPage
Tom Kelliher, CS 102
Mar. 29, 2004
Shared borders are a powerful tool for automatically including common
shared information on each of the pages of a Web site. Typically, this
would include site navigation links, contact information, date of page
modification, and hit counters. In this lab, we experiment with shared
borders.
- Start FrontPage.
- Create a new local Web on your
G: drive. Do not use
your Web on phoenix.
- Create three quick Web pages within your Web with these file names:
index.htm, page2.htm, and page3.htm. You only need
enough material on each page so that you can tell which is which by
looking at it.
- Save each of the pages.
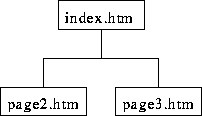
- Switch to Navigation view and arrange the three pages like so:

- Switch back to Page view, select one of your Web pages for editing,
and add a shared border (look under the Format menu) to all
of the pages --- choose the ``Apply to all pages'' option. Apply left and
bottom shared borders. The left border should include Web navigation.
- Back on the Web page you're editing, right click on the navigation
links, choose Link Bar Properties, and set the navigation
properties. Include navigation to home, parent, and children pages.
Within the left shared border, below the navigation links, type your name.
- Include a horizontal line and the date the page was last modified in
the bottom shared border.
- Preview your Web site. Note how the navigation links match the
navigation organization you defined in the Navigation view. Also, note the
material shared between the three pages.
- Return to Navigation view and arrange your pages like so:

- Return to Page view and preview your Web site again (you may have to
use the Refresh button to re-load each page. Notice how the
navigation links have changed.
- If time permits, apply a theme to the entire Web site and modify the
navigation properties so that buttons are used for the links.
Thomas P. Kelliher
Thu Mar 25 10:06:01 EST 2004
Tom Kelliher

