Tom Kelliher, CS 116
Sept. 29, 2000
Lab 3 due Monday, PostLab due Wednesday.
Read 4.4 and Lab 4 handout.
Lab 3.
Lab 4.
Everyone know what a rational number is?
Let's look at an example (RationalExample.java):
//======================================================================
//      Project:    CS 116, RationalExample example
//      Author:     Tom Kelliher
//      File:       RationalExample.java
//      Purpose:    This applet demonstrates the creation of a class,
//                  separate from the applet class we've been working
//                  with.  Its interface is slightly different from that
//                  of an applet.  It demonstrates how multiple
//                  constructors can be created for a class and how they
//                  are used.
//
//                  The example class here is Rational.  This will allow
//                  the creation of rational number objects.
//======================================================================


import java.applet.*;
import java.awt.*;


//======================================================================
//      Class:      RationalExample
//      Purpose:    The applet.  Declare a couple of Rational objects
//                  and demonstrate how they are used.
//======================================================================

public class RationalExample extends Applet
{
   Rational rational1 = new Rational(2, 3);
   Rational rational2 = new Rational(22, 7, 200, 50);


   //===================================================================
   //   Method:     paint
   //   Purpose:    Call the paint() methods of the Rational objects,
   //               since they don't know to paint themselves.
   //   Input:      g: a Graphics object, which we draw on.
   //===================================================================

   public void paint(Graphics g)
   {
      rational1.paint(g);

      rational2.paint(g);

      // This shouldn't be visible until the second time paint is called.
      rational2.xPos = 50;
      rational2.yPos = 200;
   }
}


//======================================================================
//      Class:      Rational
//      Purpose:    This class simply implements the set of rational
//                  numbers.
//      Limitation: We don't check that the denominator is not equal to
//                  0.
//======================================================================

class Rational
{
   private int num;     // Numerator of the number.
   private int denom;   // Denominator of the number.

   // X and y coordinates of where the Rational object will display.
   // These are the default x and y coordinates.
   public int xPos = 50;
   public int yPos = 50;


   //===================================================================
   //   Method:     Rational
   //   Purpose:    Constructor.  The object will be displayed at its
   //               default location.
   //   Input:      n: numerator.
   //               d: denominator.
   //===================================================================

   public Rational(int n, int d)
   {
      num = n;
      denom = d;
   }


   //===================================================================
   //   Method:     Rational
   //   Purpose:    Constructor.  The object will be displayed at the
   //               specified location.
   //   Input:      n: numerator.
   //               d: denominator.
   //               x: x coordinate of display location.
   //               y: y coordinate of display location.
   //===================================================================

   public Rational(int n, int d, int x, int y)
   {
      num = n;
      denom = d;
      xPos = x;
      yPos = y;
   }


   //===================================================================
   //   Method:     paint
   //   Purpose:    Paint the rational number at its specified location.
   //               specified location.
   //   Input:      g: a Graphics object.
   //===================================================================

   public void paint(Graphics g)
   {
      // Set a reasonably-sized font.
      g.setFont(new Font("SansSerif", Font.PLAIN, 20));
      g.drawString(num + "/" + denom, xPos, yPos);
   }
}
Things to note:
extends any
other class. Implications?
public class vs. class.
public vs. private instance variables. Levels of
abstraction.
.class files.
How much control did we have over visual design with Gigobite?
Is it important to have control?
Solution: Containers. Elements:
Panels.
Canvases.
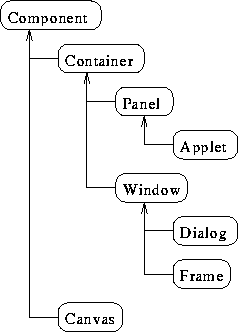
Class hierarchy snapshot:

Containers can contain containers! (add(Component) is
a Container method.)
Ordering in Space.
Can specify Component spacing.
FlowLayout()
Left-to-right, top-to-bottom.
Justification.
Components not resized.
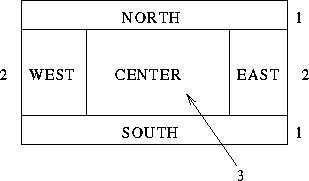
BorderLayout()
Components resized.

GridLayout()
Components resized.
Specify rows, columns.
A Container you can dump Components in.
The Component to draw on.
Why not mix drawing with widgets?
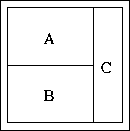
How would you get the following Button configuration?

An applet which implements this layout:
//======================================================================
//      Project:    CS 116, Layout example
//      Author:     Tom Kelliher
//      File:       Layout.java
//      Purpose:    This applet demonstrates the use of panels and
//                  layout managers to control widget placement.  This
//                  applet implements the button layout from Chapter 4
//                  exercise 10, part a (pg. 148).
//======================================================================


import java.applet.*;
import java.awt.*;


//======================================================================
//      Class:      Layout
//      Purpose:    See purpose above.
//======================================================================

public class Layout extends Applet
{
   Button bA = new Button("A");
   Button bB = new Button("B");
   Button bC = new Button("C");

   // Container for buttons A and B.  Use a GridLayout with two rows
   // and one column.
   Panel p1 = new Panel(new GridLayout(2, 1));


   //===================================================================
   //   Method:     init
   //   Purpose:    Set the appropriate layout managers and put the
   //               widgets into the proper containers.
   //===================================================================

   public void init()
   {
      // Use BorderLayout() for the applet itself.
      setLayout(new BorderLayout());
      setBackground(Color.gray);


      // Add the two buttons A and B to the panel.
      p1.add(bA);
      p1.add(bB);

      // Add button C on the east side of the applet and the panel p1
      // in the center.
      add(BorderLayout.EAST, bC);
      add(BorderLayout.CENTER, p1);
   }
}
Run
the applet.
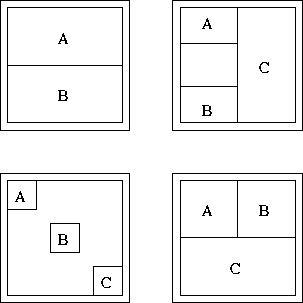
How would you do the following?
