Lab 4 - Handling Basic Interaction
Objectives
- Create an iPhone application with interaction
- Use buttons and labels
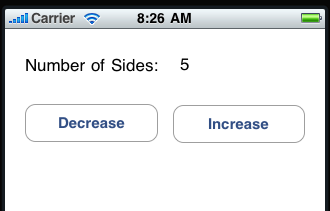
You will be creating an application which will allow the user to set the
number of sides for a polygon. (Our next lab will actually display the
polygon). We will be employing the Model-View-Controller Paradigm (MVC).
We have already created our model which are the classes that hold our data in
the last lab.
- Create a new iPhone Application project using the Window-Based Application
template. You should now be able to run your code in the simulator
which produces a blank view. This blank view is what is defined in the MainWindow.xib file. Open this file by double clicking which
will launch Interface Builder. In IB we need to layout the interface,
define and create an instance of a controller class, connect the interface
and the controller, and finally generate the source files of the controller.
- Place two labels at the top of the interface: One for the text "Number
of sides:" and the other that will be used for displaying the value.
Below that place two push buttons below that will be labeled "Decrease" and
"Increase".
Show the Attributes Inspector by selecting Tools > Attributes Inspector
which can be used to view and edit properties. You can edit the text labels.
Set the value label to "5" as a default. Edit the button text.
- We will now create a Controller class. It will have instance
variables that reference the two buttons and the value text label.
Such a reference is known as an outlet. The class will have two
methods that will be called by the buttons. Such a method is known as
an action. In the Library, select the Controllers group under the
Cocoa touch Plugin. Select the Object item and drag the icon into your
MainWindow.xib document window. Select the Object in this window and use
Tools > Identity Inspector to show the inspector window. In the Class
field, type Controller.
- We can now add the outlets and actions to the class using the Identity
Inspector. Keeping the Controller object selected, in the Class
Outlets section add the following outlets (using the + button) with the types:
numberOfSidesLabel with type UILabel
decreaseButton with type UIButton
increaseButton with type UIButton
In the Class Actions section, add two actions. Set the first action to
increase and set the second to decrease.
- Now we need to connect the outlets to the UI. Select the
Controller object in the document window and use Tools > Connections
Inspector to show that inspector. The connections inspector shows all
the available outlets and actions. Next to each outlet and action is a
connection circle. Drag the connection circle next to 'numberOfSidesLabel'
outlet to the text label in the interface window that you will use for show
the number of sides. The inspector will update to reflect that the
connection for the outlet has been established. Repeat for the
remaining two outlets.
- Now we will connect the buttons to a target and action. We want to
connect the buttons to our Controller object and have them invoke the
increase and decrease methods. These connections are made similar to
the outlets. Select the increase button. Use the connections
inspector to see a list of events that the control supports. Next to
each event is a connection circle which you can drag. Use the "Touch
Up Inside" event and drag a connection from that event to our Controller
object. Upon releasing the mouse a popup menu will appear showing the
available action methods. In this case show the increase method.
Handle the connection for the decrease button the same way.
- Be sure to save all your changes. Now we will generate the source
files for the new class. Since we defined the controller class in IB,
we don't have any source code yet. To generate the source files,
select the Controller object in the document window and the select File >
Write Class Files... A Save panel will appear and you can accept the
default settings. Another dialog will appear asking if you want to add
the newly created source files to your project. Click the check box
next to your project name and click the Add button. We are now done
defining our interface!
- Back in Xcode you should see that Controller.h and Controller.m are now
in your project. Take a look at the header file. You will notice
that the superclass has not been specified. Make the superclass
NSObject. You should also see instance variables for the buttons and
label with type IBOutlet. Finally, you should see the two methods with
the IBAction keyword.
- Now look at the Controller.m file. It should contain stubs for the
decrease and increase methods. To check that everything is set up
correctly, put in a log statement in each method
NSLog(@"In the increase method");
Select Run > Console and try out your code. Clicking on the buttons
should brings up the proper logs.
- We have the View and Controller. Now we need to add the model to
our MVC. To add our PolygonShape files to the project use Project >
Add to Project... and select the PolygonShape.h and .m files from your
previous lab. Shift select both files and click Add. Be sure
to check Copy items into destination group's folder.
- Now to connect the controller to the model. Add an #import
PolygonShape.h to your Controller.h file. Add a new instance variable
outlet of type PolygonShape to your Controller class as an IBOutlet.
Be sure to save Controller.h after the changes to IB notes the change.
In IB drag a new custom object into the document window and set the class to
PolygonShape. Use the connections inspector in IB to establish a
connection from the Controller instance to the PolygonShape instance and
save the nib file. Build and Run as a quick check that everything is
as it should be.
- We are ready to implement the desired behavior! Since the
Controller and PolygonShape instances are created in the nib, we need to
have a point in the execution when these objects have both been instantiated
and we can initialize the state. All objects in a nib receive an
awakeFromNib method call. This is an ideal point in which to configure
our polygon object's minimum, maximum and current number of sides.
Write the Controller method:
-(void)awakeFromNib {
// configure your polygon here
}
Set the minimum and maximum to 3 and 12.
To set the numberOfSides, we can use the value in the text label.
Since we are in awakeFromNib, all the user interface elements have been
loaded and our outlets established. You can get the value of the
numberOfSidesLabel by doing
numberOfSidesLabel.text.integerValue
To check that all the connections are set up correctly, display the polygon
description at the end
of the awakeFromNib.
Test out your code at this point.
- Finally, we need to write the increase and decrease methods. These
actions need to retrieve the current number of sides from the polygon,
increment or decrement that number, set the new number of sides on the
polygon, and update the interface to reflect the new state.
We will write a method to update the interface. This will involve
enabling or disabling the buttons depending whether the current number of
sides is greater/less than the minimum and maximum, and setting the text of
the label to indicate the current number of sides.
Write the method:
-(void)updateInterface {
// set interface state
}
You can set the enabled property of a UIButton as follows:
myButton.enabled = NO; // or YES
You can set the text of a UILabel as follows:
myLabel.text = [NSString stringWithFormat:@"%d", someNumber];
Test out your code.
- Compress your project and send it to me through the Dropbox in
BlackBoard.