Lab 1 – The Eclipse Visual Editor
Objectives
- Become familiar with Eclipse and the Visual Editor Plug-in
- Create a GUI tool with a toolbar and menu
- Extend the GUI for added functionality
- Download the icons provided and
create a project directory which contains them on your network drive.
- Open Eclipse and create a new project in that directory:
- Select New under the File menu and select Java Project
- Give your project a name of your choosing, check the option for creating the project in an external location, and browse for your network directory
- Select Finish
- Create a new class which we can edit in the Visual Editor:
- Right click on your project name in the Package Explorer window to bring up a pop up window.
- Select New – Visual Class.
- Give your class a name of your choice and select the Swing Frame from the style choices. Make sure your class is public.
- Select Finish
- You should now have an empty JFrame in your visual editor. Notice that you have a visual representation
of the GUI as well as the java code that the editor is providing for
you. You also can view the Java
Beans (components) and their properties in another frame. In the visual editor resize your frame by
selecting it and dragging the edges.
- In the visual frame, right
click on the top of JFrame component to get a
pop up menu and from there change the title of the frame.
- Take a moment to glance
through the list of properties of the JContentPane
of our frame. Select the background
property. You will get a button
appearing next to it which will bring up an editor pane where you can
change the background color. Do so.
- Check the properties of the JContentPane and make sure that the layout property is
a border layout. It is possible to
change the layout the same way we changed the background.
- You are now ready to add some
components to your frame! Using the
tool palette select a Swing JLabel and add it to
the center of your JContentPane. The editor will guide you to possible
locations given the layout of the component. Using the same process, add a toolbar
from the Swing Containers to the north.
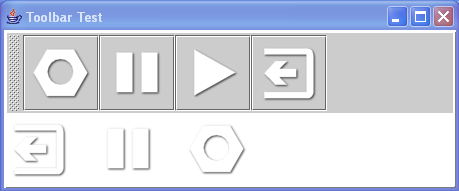
Your toolbar will initially be very skinny because it does not have
any buttons yet. That will change!
- Again using the palette, add
four buttons to your toolbar. You
will have position the cursor carefully over the skinny toolbar when
dropping the button.
- Let us display icons on each
of those buttons. Using the
property list for each button, select the icon property and then select
the icons files that I provided for you.
You should probably also rename the buttons to give them more
meaningful names.
- Let us run our GUI even
though it does not do much yet.
Under the Run menu select Run As Java
Bean. You can also use the run icon
in the eclipse toolbar. Try moving your
toolbar around and repositioning it.
- Now let us make the buttons
do something. We want it so that
when a button is selected, its icon is copied to the label in the
frame. Right click on a button and
select Events - actionPerformed . This will add an anonymous actionListener to the button. Change the body of the actionPerformed method to set the Icon of the
label. (Use the getIcon
and setIcon methods for the button and the label
objects.) You will also want to edit the
properties of the jLabel object to remove the text. Test out your changes.
- You will have less guidance
for the remaining additions to the GUI.
Add a menu to your Frame. A
menu consists of a Menubar that contains Menu
objects. Each Menu will in turn
contain a sequence of MenuItems which simply act
the same as buttons. All these
objects can be found in the palette.
You may find the following tutorial useful: http://java.sun.com/docs/books/tutorial/uiswing/components/menu.html
Create a help menu that has two menu items. One can be an “About” selection which simply displays a dialog with your name as author.
Hint: In the visual editor you can create a dialog object outside of the frame and for the actionperformed of the menuItem you simply use the show method to display the dialog.
Your second menu item can be anything you want.
- Change your frame so that instead of
having a single label you have an array of labels. When a button is selected you will add
the icon into the next available label.
In the center of the frame display the labels in a JPanel using a grid format:
- Send your completed project folder to jzimmerm@goucher.edu in zipped format for grading.